
In Part 2 of our series on bluewater sailing preparation, Vicky Ellis looks at chafe, rig problems and how to keep your crew on side

In this series we examine some of the more likely incidents that occur on long bluewater ocean passages, not necessarily the headline catastrophes. Here I’m going to look at some of the issues that may occur with the rig, and how to keep your crew – your biggest asset – on side, happy and healthy.
Chafe is the enemy
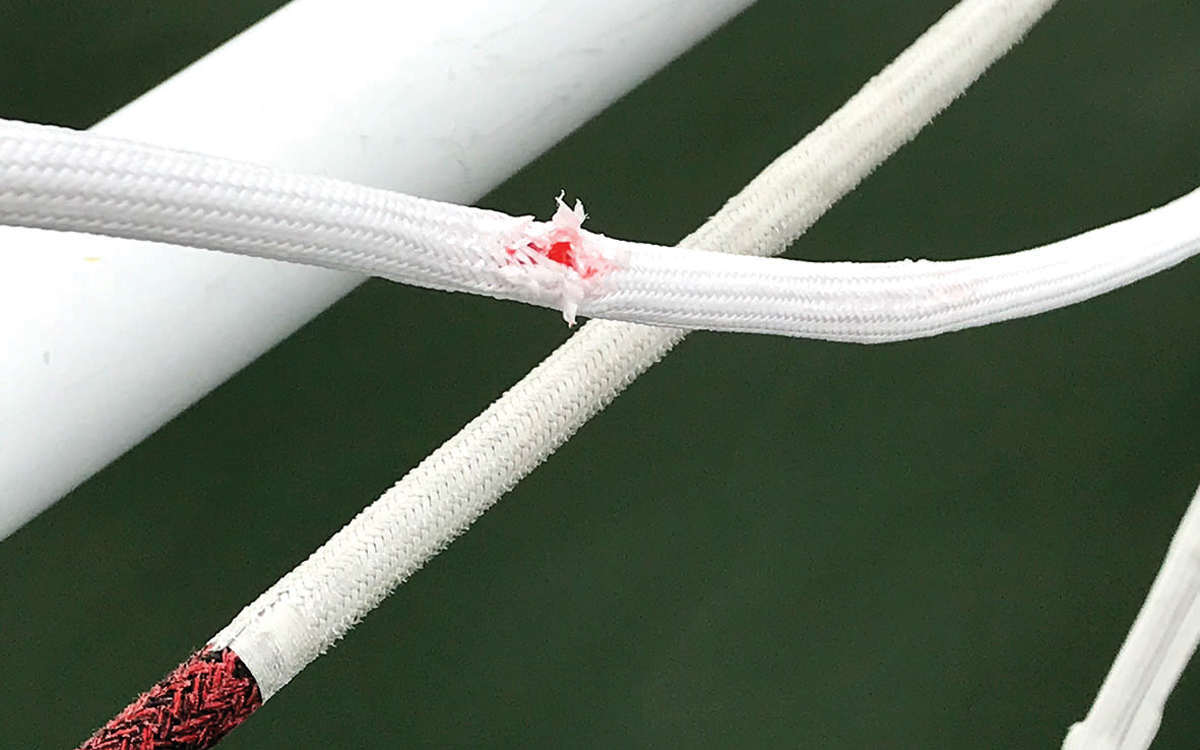
Losing your rig might be foremost in your mind, but before we get on to that, let’s look at something you definitely will experience: chafe. Chafe is one of the biggest gremlins for bluewater cruisers. Keeping chafe at bay, checking for it and protecting against it with careful design, clever ideas and some anti-chafe protection will get you through a voyage unscathed. Without this, it will eat its way through halyards, sheets, sprayhoods and more in a matter of days, if not hours.
Jerry Henwood (best known as ‘Jerry the Rigger’) explains that a halyard with a small amount of play will roll a tiny amount backwards and forwards on it’s turning blocks with every wave and, in the course of a typical Atlantic crossing, could therefore move the equivalent of 8km while loaded. Shifting your halyards a centimetre or two a couple of times a day will help move the wear point on sheaves and jammers and prolong life.

Photo: Tor Johnson
If you can’t bear the sail trim that this trick produces, then take some lengths of the thin yet tough anti-chafe Dyneema sleeve. It can be secured over the top of your lines in areas of wear.
This rope chafe protection is especially good where guys go thorough pole beaks, for tack lines that may chafe on a swivel block, and reefing lines or halyards. If you can’t get hold of the specially designed anti-chafe sleeve, the outer sheath of old sheets can be placed over the top of ropes. Just ensure that the edges of the outer cover are well stitched and whipped on to prevent the sleeve coming loose and jamming the line.
Other tips for prolonging the life of your lines are to end-for-end them every so often or to buy them extra long and trim some off when it looks worn. Other items I squirrel away before setting off are snatch blocks, big and small – and well made. They’re an expensive collecting habit, but worth it.
Article continues below…

Is your yacht oceanproof? How to prepare your boat for (nearly) anything
Well-prepared boats have dealt with half the battle when it comes to emergencies and challenges at sea. But beyond the…
Pip Hare’s top tips for preventing chafe on lines, sails and hardware
Chafe on sails and ropes is something we should expect as part of the general wear and tear on passage,…
Preventers that run back to the cockpit, poled-out jib sheets and downwind rigs all get in the way of something and having snatch blocks and a stash of soft shackles or Spectra strops can allow you to make an easy re-routing plan to avoid chafe in the middle of a valuable line.
Poled-out headsails are the bread and butter of bluewater downwind rigs. It’s a good idea to secure your pole independently of the headsail sheet using an uphaul/topper, downhaul/foreguy and guy/aft guy. Running the headsail sheet through a snatch block attached to the outer end of the pole reduces chafe in the beak and means you can furl the sail quickly if a squall crops up, without worrying about moving the pole.
To avoid the clanging sound of a snatch block hitting your pole, add a wrap of thick leather or rope around the end of the pole to absorb the clangs.

Sacrificial sleeves of Dyneema or old line sheaths will help protect against chafe in areas of high wear
Chafe also affects canvas and sails; it’ll not take long to wear a hole if a mainsheet is rubbing on a bimini or sprayhood. I do chafe checks after every new sail set-up and on the whole boat twice a day at sea. I like to do a dawn and dusk check and get the rest of the crew involved, so that it’s not a case of one pair of eyes looking for the problem or knowing what to spot.
Meanwhile, UV will degrade canvas covers, sails and plastic fittings (especially plastic jackstay buckles), craze hatches and degrade vanish. Keep a look out for its effect, as frustrating failures can occur as a result.
Rig checks
Not only does a full rig check need to be done before setting off on passage, it needs to be done regularly at sea too. A good pair of binoculars is a great help if going aloft is difficult, and perhaps one day it’ll be commonplace to put drones to this use. Capturing your rig in detail on camera is a great way to confirm any changes.
When it comes to learning about your rig and what to look for during a rig check, working alongside a professional is hugely informative, confidence-inspiring and something I’d definitely recommend. You can also develop a checklist with them for your rig.
Start at the top of the rig and work your way down, then go on deck from bow to stern. Choose good weather and good light. A good bosun’s chair or harness will keep you comfy for longer, enabling you to take a really good look. Use all your senses: look and feel particularly, and take off and replace all coverings. Clean rust away with a squirt of WD40 or similar and take a magnifying glass – a really handy tool to take up. Just make sure your tools are securely attached to you while aloft.

Enjoying the long days of downwind sailing. Note the preventer led from the boom end to the bow and back to the cockpit
In general you’re looking for signs of wear and tear, the beginnings of cracks, things missing, loose or broken, and wire/rod problems. At the masthead, check everything you have up there such as lights, aerials, etc. Check the stays and shrouds where they join the mast, paying attention to cracks in tangs or lugs, weld cracks and problems around the swaged end fittings on the mast.
Where wire rigging enters the swaging is where it’s most susceptible to damage from stress concentrations and fatigue, which will cause the wires to de-strand, break off or become distorted. Use your fingers to feel up against the swaging terminus for sharp edges and your eyes to see bulging or breaks.
Slacken off the running rigging and lift up the halyards to check the sheaves are rotating freely, haven’t worn a groove or become cracked. Left unchecked, this can quickly progress to a case of a jammed halyard which, if the sail is up, is a very an unwelcome problem at sea.
Spreaders have a tough job and are subject to pumping forces and loads in all directions, and as such are susceptible to fatigue failures too. Their alignment and angles need to be checked as they can change. It’s not uncommon to find problems at their mast joints. Inspect the cap shroud where it passes against the spreader end for signs of movement, wear or damage. Feel the edges of the spreader. If rough and your sail will rest against it, consider some padded chafe protection.
Spreader end cap covers are great if your main will rest here downwind (or your spinnaker might!) but do make sure they’re easily removable for checks and, as with all protective coverings, ensure they don’t trap moisture. On your way down, feel in the mast track/furler and spinnaker pole track for sharp edges, loose rivets or other problems. Check your radar (and reflector) brackets.
At deck level, check each of your rig connection points and chainplates. Wire rig swaged terminals need checking, particularly as these upwards-facing terminals are more susceptible and, in particular, check for articulation issues. Bottlescrews can become bent and the threads damaged but you can only tell this when you slacken the rig off and undo them.