
With the help of Peter Bruce’s encyclopaedic knowledge of the Solent and Ian Lallow’s expert practical tips, Matthew Sheahan outlines the areas of concern in the western Solent.

Knowing how to play the rocky Island shore and the shallow mainland coastline of the western Solent can make a big difference to your overall performance when considering your Cowes Week tactics. Peter Bruce’s expert knowledge of the underwater profile of the Solent can make you more aware of the dangers lurking beneath the water, and local sailor Ian Lallow shares some of his hard-won Solent know-how.
This information comes from our popular Essential Weather Rail Guide, which was published in 2001, so some of the names of marks on charts have been updated for 2015.

Also be aware that there is now a large breakwater surrounded by yellow exclusion buoys, which can make it harder to identify some race marks. See Cowes Online for up to date details.
However, some things don’t change and the tips in here is still relevant to racing in the Solent today.
See also our guide to racing in the Eastern Solent
Photographs taken by Peter Bruce at times of exceptionally low tide.

Peter Bruce’s book Solent Hazards is still available – see his website for more information
Eddy off The Green

Runs west for 9 hours in every 12.4
Best at 3 hours before HW
With the main tidal stream running east, and with a course set heading to the west, head for the tidal eddy shown here which should sweep you along The Green.
Don’t go too far inshore (out of the sector) between the Royal Yacht Squadron and Egypt Point as you’ll sail out of the eddy and into trickier/shallower waters.
Lion and Grantham Rocks
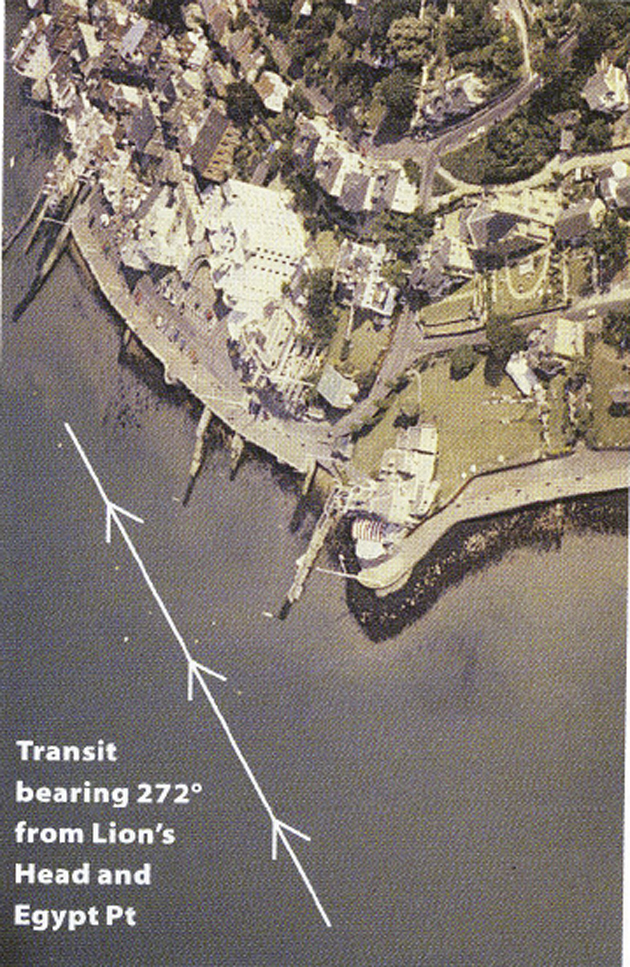
Lion Rock lies just off the eastern end of the Royal Yacht Squadron garden. Be particularly careful when heading to the west that you don’t get caught in the trap behind Grantham Rocks, which lie off Cowes Green.
Clearing these rocks when passing in either direction is easy so long as you keep an eye on the transit between the Lion’s nose and the Egypt Point light structure. A tansit bearing 272°M will keep you clear.
Inside Gurnard Ledge

When heading towards the west and, provided you hug the Island shore, you will be funnelled into the channel that runs to the south of Gurnard Ledge. A white marker buoy (Baxters), laid only during the summer, is the main guide to your exit. Pass to the north of this buoy by about 50m.
Use the same buoy to find the entrance to the channel when heading east. If you decide to pass on the outside (west side of the Ledge, your cue to go back inshore around the eastern end of the ledge is when the Gurnard Sailing Club mast bears 086M.
Laylines to mid-channel markers
If your weather mark is one of the mid-channel markers such as East or West Lepe and the tide is against you (east-going), make sure you go well up the shoreline before heading out into the Solent to ensure that you can lay the mark in one tack.
The tide runs fast in the middle and to have to tack again into the flooding tide will always be very costly.
Over-stand if necessary and always take a transit to gauge your progress.
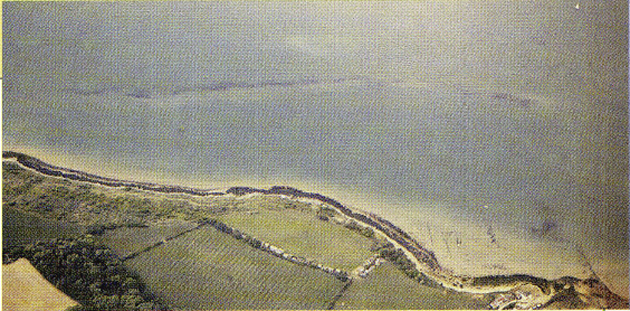
Salt Mead Ledge
 A typical shore-hugging beat across Thorness Bay can lead you into a trap at Salt Mead, where the hook in the shallows can lure you to go aground on an offshore tack.
When approaching from the west, you will find the ledge so steep that little warning is given before you hit it.
The tip here is to keep an eye out for fish pots and choppy water, both of which will indicate the outer end of the ledge.
No wind?
All too frequently a strategy devised to blow away the competition falls apart when the wind dies. You can will the breeze to fill in, but the only sure fact is that, sooner or later, the tide will start to run.
To seasoned Cowes crews this simply means that the racing has taken another turn, where knowing when to kedge is the key to a good result.
Dropping the hook in the right place can often gain you more places than the biggest windshift on offer.
Always make sure, if there’s a chance the wind might die, your kedge and warp are ready to run at a moment’s notice.
See David Houghton’s guide to Solent breezes to give you a handle on Cowes weather
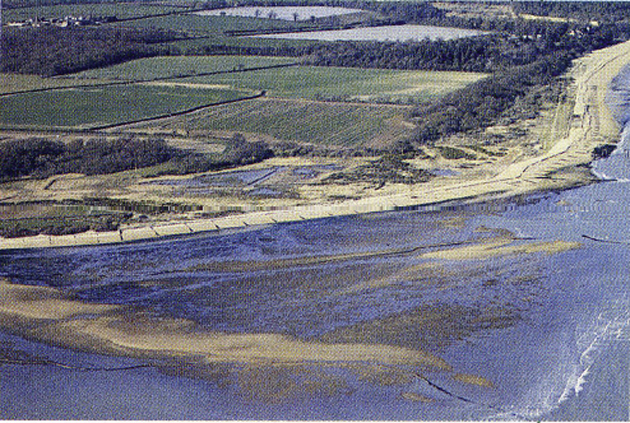
Lepe Bank

Running aground on an offshore tack is common here. The mud bank lies off the old coastguard cottages at Needs Ore. The bank can be crossed at high water.
Stansore Point
The outer extremity of Horseshoe Spit is around 15m to the west of the Lepe Spit Cardinal Buoy, the famous piles having been removed several years ago.

Look for turbulent water as a guide to the location of the spit. Big gains can be made by staying out of the tide here, but be careful when approaching from the east as there are shingle humps and redundant pipes to the north-east of the spit.
A west-going eddy can be found in Stanswood Bay when the tide is flooding strongly.
Island or mainland shore?
Sailing up the middle of the western Solent in either direction rarely pays if the tide is against you and you’ll need to head for one of the shorelines. But which one?

Typical Cowes starts with a westerly breeze will provide a long beat against the east-going tide. If your weather mark is west of Salt Mead, beat along the mainland shore as the greater area of shallower water and weaker tidal currnet provide a wider band of water in which to beat.
Pick the Island shore when there’s a southerly component in the wind as you’ll most likely find large port tack lifts.
If you are running against the tide, pick the shoreline closest to your track to the next mark.